Chai coffee Pot the Crème

Have you ever head of pot the creme? Not me before I stumbled upon it on one of my favourite foodblogs La Tartine Gourmande. If you ask all-knowing Wikipedia about this French dessert it just answers you: "Pot de crème is made with eggs, cream, milk, and a flavor, often vanilla. The mixture is then poured into ramekins which are then baked in a water bath." Basically it is the (more sophisticated) French version of our German Pudding (custard), which isn't made with eggs but with corn starch. Nobody in Germany I know makes Pudding from scratch (except me and my dear friend André of course who likes to use all chocolate rests he doesn't likes to eat ). Normally you just buy a package, cook milk, stir in powder and sugar - ready. So I wanted to try the French version which is very handy if you (like me) alway have eggs and milk in your fridge. The time I tried this recipe, I was in love with a instant chai coffee I found at my supermarket (right, I confess I too used instant stuff in some way) - and I love coffee flavour ...

Chai coffee Pot the Crème
for 6 small glas jars
  • 1 egg and 1 egg yolk
  • 1 tablespoon sugar
  • 250 ml milk
  • 1 teaspoon instant espresso powder
  • one package instant chai coffee (Krüger)
In a pot, pour the milk bring to a boil. Mix in the espresso and chai coffee powder. Preheat your oven at 160°C. In a bowl, beat the eggs and egg yolk with the sugar, then add the hot milk slowly while beating. Pour the cream in small ramekins or jars and place them in a dish (or large baking mould) filled with hot water, so that they are half immersed. Place in the oven and cook for about 35 to 40 minutes. The middle of the creams should still be moving a little - the creams will settle once they cool down. Take the jars or ramekins out and let them cool down. Place a plastic wrap on top and place them in the fridge to rest for a few hours before eating.


There are lot's of variations you can make according to the flavours and I've picked out some interesting recipes from my favourite food blogs:
Potsdecremes.com (dessert history and recipes - even some savoury ones)
Maple Pot the Crème from O Pistachio
Chocolate and Vanilla Petits Pots de Crème from La Tartine Gourmande
Chocolate and Raspberry Pot de Crème, Lemon Thyme Pot the Crème and Butterscotch Pot the Crème from Canelle et Vanille

Daring Bakers March Challenge: Orange Tian

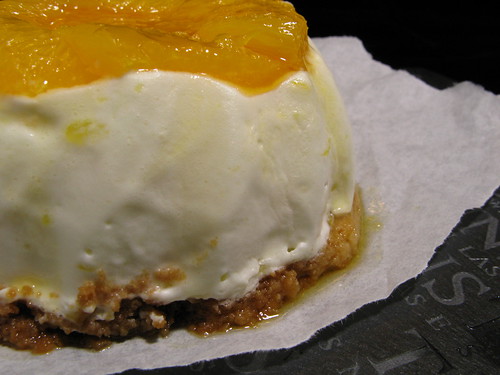
The 2010 March Daring Baker's challenge was hosted by Jennifer of Chocolate Shavings. She chose Orange Tian as the challenge for this month, a dessert based on a recipe from Alain Ducasse's Cooking School in Paris.

There are quite a few steps to making this dessert; however a lot of them can be made in advance. The tian consists of a pate sablee (the bottom), orange marmalade, whipped cream, orange slices and caramel. It has to be build upside-down, starting with the orange slices, then the cream and the pate with the marmelade at last. You'll therefor need cookie cutters . Ideally, you should have about 6 cookie cutters to build the desserts in and cut the circles of dough. The cookie cutters will be the size of your final dessert, so they should be the size of an individually-sized tart mold. If you don't have round cookie cutters you could use an individually-sized cheesecake mold without its base. I used some of my dessert rings, a small bundt cake mould and (just for fun) a dinosaur cookie cutter (which was a christmas present of a good friend).

What you can do in advance: The orange marmalade can be made several days ahead of time and the caramel sauce and orange segments preparation should be made the day before you make the dessert. As usual I wasn't as thoughtful as I'm writing here and made everything of the mentioned above two days ago (cause I had duty yesterday). I needed more preparing the tiramisu, but this time I struggeled more. One of the things I hate most is making orange slices - juice everywhere, burning hands and oranges some fall apart ... The result was quite good although I don't like that much cream in my desserts. I used the rests for another cake (taking it to the job tomorrow) and can't wait to try this one too ...


Orange Tian

for the Pate Sablee:
  • 2 medium-sized egg yolks at room temperature
  • 80 grams granulated sugar
  • ½ teaspoon vanilla extract
  • 100 grams unsalted butter, ice cold, cubed
  • 2 grams salt
  • 200 grams all-purpose flour
  • 4 grams baking powder
Put the flour, baking powder, ice cold cubed butter and salt in a food processor fitted with a steel blade (works also fine with your fingers if you don't have a food processor). In a separate bowl, add the eggs yolks, vanilla extract and sugar and beat with a whisk until the mixture is pale. Pour the egg mixture in the food processor. Process until the dough just comes together. If you find that the dough is still a little too crumbly to come together, add a couple drops of water and process again to form a homogenous ball of dough. Form into a disc, cover with plastic wrap and leave to rest in the fridge for 30 minutes. Preheat your oven to 180 °C.
Roll out the dough onto a lightly floured surface until you obtain a ¼ inch thick circle. Using your cookie cutter, cut out circles of dough and place on a parchment (or silicone) lined baking sheet. Bake for 20 minutes or until the circles of dough are just golden.

for the marmalade:
  • 100 grams freshly pressed orange juice 1 large orange used to make orange slices
  • cold water to cook the orange slices
  • 5 grams pectin
  • granulated sugar: use the same weight as the weight of orange slices once they are cooked
Finely slice the orange. Place the orange slices in a medium-sized pot filled with cold water. Simmer for about 10 minutes, discard the water, re-fill with cold water and blanch the oranges for another 10 minutes. Blanch the orange slices 3 times. This process removes the bitterness from the orange peel, so it is essential to use a new batch of cold water every time when you blanch the slices.Once blanched 3 times, drain the slices and let them cool. Once they are cool enough to handle, finely mince them (using a knife or a food processor). Weigh the slices and use the same amount of granulated sugar . If you don't have a scale, you can place the slices in a cup measurer and use the same amount of sugar. In a pot over medium heat, add the minced orange slices, the sugar you just weighed, the orange juice and the pectin. Cook until the mixture reaches a jam consistency (10-15 minutes). Transfer to a bowl, cover with plastic wrap and put in the fridge.

for the orange segments:

For this step you will need 8 oranges. Cut the oranges into segments over a shallow bowl and make sure to keep the juice. Add the segments to the bowl with the juice.

for the caramel:
  • 200 grams granulated sugar
  • 400 grams orange juice
Place the sugar in a pan on medium heat and begin heating it. Once the sugar starts to bubble and foam, slowly add the orange juice. As soon as the mixture starts boiling, remove from the heat and pour half of the mixture over the orange segments. Reserve the other half of the caramel mixture in a small bowl - you will use this later to spoon over the finished dessert. When the dessert is assembled and setting in the freezer, heat the kept caramel sauce in a small saucepan over low heat until it thickens and just coats the back of a spoon (about 10 minutes). You can then spoon it over the orange tians.

for the whipped cream:
  • 200 grams heavy whipping cream
  • 3 tablespoons of hot water
  • 1 tsp Gelatine
  • 1 tablespoon of confectioner's sugar
  • orange marmalade (see recipe above) 1 tablespoon
In a small bowl, add the gelatine and hot water, stirring well until the gelatine dissolves. Let the gelatine cool to room temperature while you make the whipped cream. Combine the cream in a chilled mixing bowl. Whip the cream using a hand mixer on low speed until the cream starts to thicken for about one minute. Add the confectioner sugar. Increase the speed to medium-high. Whip the cream until the beaters leave visible (but not lasting) trails in the cream, then add the cooled gelatine slowly while beating continuously. Continue whipping until the cream is light and fluffy and forms soft peaks. Transfer the whipped cream to a bowl and fold in the orange marmalade.


Assembling:

Make sure you have some room in your freezer. Ideally, you should be able to fit a small baking sheet or tray of desserts to set in the freezer. Line a small tray or baking sheet with parchment paper or a silicone sheet. Lay out 6 cookie cutters onto the parchment paper/silicone. Drain the orange segments on a kitchen towel. Have the marmalade, whipped cream and baked circles of dough ready to use. Arrange the orange segments at the bottom of each cookie cutter. Make sure the segments all touch either and that there are no gaps. Make sure they fit snuggly and look pretty as they will end up being the top of the dessert. Arrange them as you would sliced apples when making an apple tart.Once you have neatly arranged one layer of orange segments at the bottom of each cookie cutter, add a couple spoonfuls of whipped cream and gently spread it so that it fills the cookie cutter in an even layer. Leave about 1/4 inch at the top so there is room for dough circle. Using a butter knife or small spoon, spread a small even layer of orange marmalade on each circle of dough.Carefully place a circle of dough over each ring (the side of dough covered in marmalade should be the side touching the whipping cream). Gently press on the circle of dough to make sure the dessert is compact. Place the desserts to set in the freezer to set for 10 minutes.
Using a small knife, gently go around the edges of the cookie cutter to make sure the dessert will be easy to unmold. Gently place your serving plate on top of a dessert (on top of the circle of dough) and turn the plate over. Gently remove the cookie cutter, add a spoonful of caramel sauce and serve immediately.

Schmortopf 'Jamie Oliver Style'

Kocht jemand von Euch Gulasch? Nein? Ich bis jetzt auch nicht - ich erinnere mich mit Schrecken an die Samstag-Vormittage in unserer Küche, meine Mutter in Dampf eingehüllt, von von ihrem Schnellkochtopf schwärmend und auf die Möhre zum Soße binden schwörend. Gulasch bestellt man im Dorfgasthof aber kocht ihn nicht zu Hause, dachte ich mir damals. Mein Liebling Jamie schwört aber in seinen zahlreichen Büchern immer von Fleischgerichten, langsam im Topf geschmort, so dass ich einfach mal einige Rezepte ausprobiert habe.
Ein Aha-Erlebnis war für mich die Lasagne mit Kürbis aus "Essen ist fertig!" wo die Fleischsoße nach so einem Prinzip zubereitet wird. Sie macht wirklich eine Heidenarbeit, aber das Ergebis ist mhmhhhhhhhh ... Leider habe ich damals keine Fotos gemacht. Wer sich vor mehr Arbeit für besten Geschmack nicht scheut, findet das Rezept hier (wer den Kürbis scheut, läßt die Kürbisschicht einfach weg).
Das Fleisch wird wirklich schön weich, und obwohl Jamie meint man müßte es nicht unbedingt anbraten, bin ich ein Verfechter der "schön kross anbraten"-Methode. Falls ihr also mal ein schönes Stück Fleisch habt, könnt ihr es nach folgendem Prinzip verarbeiten:

für 2 Personen
  • 400 g Fleisch, gewürfelt (bei Geflügel verkürzt sich die Garzeit)
  • 100 g Schinkenspeck, gewürfelt
  • eine Zwiebel, gehackt
  • eine Knoblauchzehe, gehackt
  • eine Möhre, gehackt
  • ein Lorbeerblatt
  • eine Handvoll gemischte frische Kräuter (Oregano, Rosmarin, Thymian, Salbei)
  • Salz & Pfeffer
  • Chillipulver & Zimt (nach Belieben)
  • anderthalb kleine Dosen geschälte Tomaten
  • 1 großes Glas Rotwein oder Wasser
  • zusätzliches Gemüse nach Belieben (Kürbis, Rüben oder Pilze)
  • Olivenöl
Den Backofen auf 180°C vorheizen. In einem ofenfesten Topf den Speck zusammen mit dem Zimt in etwas Öl anbraten, dann die Kräuter, Möhre, Zwiebeln und Knoblauch sowie das Chilipulver zugeben. Alles gut vermischen. Das Fleisch zufügen und ein paar Minuten unter rühren braten. Wasser/Wein, die Dosentomaten und das Lorbeerblatt unterrühren und aufkochen lassen. Vom Herd nehmen. Ein Blatt Backpapier feucht machen, den Topf damit bedecken und den Deckel aufsetzen. Für anderthalb Stunde in den Ofen stellen (bei Geflügel reicht eine Stunde). Wer keinen Ofen hat, kann das Ganze auch auf niedriger Flamme so lange köcheln lassen. Am Ende der Garzeit das Lorbeerblatt entfernen. Wer jetzt seine Soße noch cremig haben will, kann einen Teil abschöpfen und mit einem Stabmixer pürieren.


Dazu passen Nudeln, Kartoffeln oder auch Gnocchi. Ideal zum Einfrieren (falls was übrig bleibt)oder zur Zubereitung wenn man nebenbei noch etwas anderes machen möchte und das Essen nicht sofort auf dem Tisch stehen muss. Jedenfalls dampft es in der Küche nicht mehr, und besser als das Gulasch vom Dorfgasthof ist es allemal.

Brunch für Freunde und ein Rezept für Bananen-Kokos-Muffins

Gestern hatte ich volles Haus. Da ich mich im Februar durch den Urlaub um eine Geburtstagsfeier gedrückt hatte, war diese jetzt fällig. Aber ehrlich gesagt finde ich Kaffee trinken langweilig. Wer will schon verschiedene Kuchen in sich reinschieben - und der 'Zuckerschock' hinterher sucht jedes Mal seines gleichen. Warum nicht brunchen? Ich liebe brunchen! Stundenlang frühstücken, warmes und kaltes, süßes und herzhaftes Essen, zwischendurch noch einen Kaffee oder Saft ... der Inbegriff der Langsam- und Gemütlichkeit. Ich war den ganzen Freitag Abend und Samstag früh mit den Vorbereitungen beschäftigt - keine Zeit um Fotos zu machen, aber eine Zusammenstellung der leckeren Speisen, die es außer dem Käse-, Wurst- und Obstteller gab will ich nicht vorenthalten. André fand alles so gut, dass er seinen Teller mehrmals füllte und hinterher seinen facebook-Status auf 'food coma' setzten mußte ;)
  • Hokkaido-Milchbrot als Zopf mit Mohn
  • Apfel-Brombeeren-Crumble (angelehnt an dieses Rezept, nur mit Brombeeren und etwas anderen Nüssen in den Streuseln)
  • gefüllte Conchiglie * (diesmal habe ich die Auberginen im Ofen gebacken, enthäutet und püriert - das ging schneller und schmeckte genau so gut)
  • * die restlichen gab es heute mit neuer Füllung - anstatt Auberginen in Öl eingelegte getrocknete Tomaten (püriert), eine Handvoll gemahlene Walnüsse und anstatt Provolone geriebenen Parmesan und Etorki (Schafskäse)
  • Lachsbuletten (oder 'laksekarbonader' wie der Norweger sagt - nach einem Rezept von Andreas Viestad aus 'Nord for Eden')
  • Oreo-Brownies mit Frischkäse (nach einem Rezept von Playing House, allerdings habe ich die Oreos geteilt, die Creme in den Frischkäse gerührt und die Kekshälften grob zerkleinert und mit dem Teig gemischt)
Die folgenden Muffins hätten auch noch gut dazu gepasst, aber zum Glück habe ich nicht noch mehr zu Essen gemacht, denn trotz über 10 Leuten ist noch jede Menge übrig. Robert und ich ewrden die restliche Woche von Resten leben .. Dieses Rezept schlummert aber schon länger in meiner Schublade und muss jetzt endlich mal raus:


Bananen-Kokos-Muffins
  • 260 g Mehl
  • 45 g Kokosmilchpulver
  • 2 TL Backpulver
  • 1 TL Natron
  • 1 Ei
  • 125 g Zucker
  • 150 g Straciatella-Joghurt (bei Naturjoghurt 15 g Zucker mehr dazugeben)
  • 80 ml Buttermilch
  • 80 ml Öl
  • ca 4 EL (20 g) Bananensirup
  • 2 große reife Bananen
  • (wer kein Kokosmilchpulver hat, kann auch anstatt Bananensirup Kokossirup verwenden)
Mehl, Kokosmilchpulver, Backpulver und Natron in einer großen Schüssel vermischen. Die Bananen mit einer Gabel zerdrücken oder in er Küchenmaschine zerkleinern. Das Ei mit dem Sirup und dem Zucker schaumig schlagen; Öl, Buttermilch, Joghurt und Bananen dazugeben. Die flüssige Mischung in die Mehlmischung gießen uner verrühren. Den Teig in Muffinformen füllen und bei 180°C im vorgeheizten Backofen 20 Minuten backen.

Daring Cooks March Challenge: Risotto feat. my Summer Risotto with fennel, tomatoes and salmon

The 2010 March Daring Cooks challenge was hosted by Eleanor of MelbournefoodGeek and Jess of Jessthebaker. They chose to challenge Daring Cooks to make risotto. The various components of their challenge recipe are based on input from the Australian Masterchef cookbook and the cookbook Moorish by Greg Malouf.

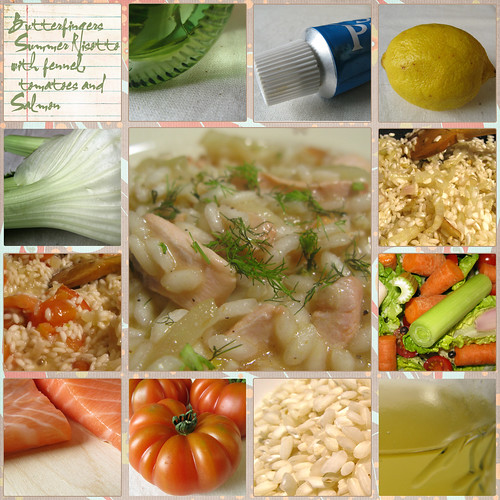
The challenge was to make your own stock and risotto base, the rest was left to you. As I have made dozen of risottos since I found out how delicious it is, this was a piece of cake for me. So sorry girls, I messed a little bit wiht your risotto base because I needed to do some adjustments for my recipe. It was inspired by a pasta sauce I cook regularly and which contains fennel, anchovy paste, tomatoes, garlic and sometimes (smoked) salmon. I decided for a vegetable stock, if you wish to have a 'fishier' taste, you can use fish stock. The taste of the risotto reminds me a lot of summer, so this is my ultimate summer risotto.


Butterfingers Summer Risotto with fennel, tomatoes and salmon

Vegetable stock (adjusted from Valentina Harris Risotto Cookbook):
  • two carrots, cut into four pieces
  • one large onion, halved
  • two celery stalks, cut into four pieces
  • two tomatoes, halved
  • 1/2 leek
  • eight lettuce leaves, halved
  • two pinces of salt
  • five juniper berries
  • 1,2 l cold water
Put vegetables, berries and salt into a pot and cover with the water. Bring to a boil and let it simmer for 90 minutes. Let it cool and pour through a sieve.

Risotto:
  • 4 tbs. olive oil
  • 1 small onion, chopped
  • 1 teespoon of anchovy paste
  • one clove of garlic (optional)
  • one fennel, cut into small stripes
  • 400 g risotto rice (Arborio)
  • 60 ml dry white wine (Pinot Grigio)
  • 1 litre vegetable stock
  • 3 medium-sized tomatoes, cut into large pieces
  • two fillets of salmon, skinned, cut into cubes
  • zest and juice of one lemon
  • 2 tbs. butter
  • salt and pepper
Heat oil in a pan and add the fennel and the anchovy paste and stew for about ten minutes until soft. Add the onion (and the garlic). Fry for a few minutes to flavour the oil. Add the rice and stir for a few minutes to coat each grain of rice with oil and toast slightly. Add the wine and let it bubble away until evaporated. Add enough stock to cover the rice by a finger's width (about an inch or two). Cook on medium heat, stirring with a wooden spoon from time to time, until most of the stock has been absorbed. Repeat this step but make sure to leave aside approximately 100 ml. (approx. ½ cup) of stock for the final step. Usually a risotto needs 20 minutes to be ready (soft on the outside and firm on the bite inside) from the point of adding the wine. So for the following steps I'm counting the minutes after the fist (adding wine) step: (+10) Add the tomatoes. (+15) Add the salmon and the lemon zest. (+18) Add the final 100ml of stock and the butter and stir until both are completely absorbed, season with salt and pepper (no parmesan because this is a seafood risotto). Stick the lid on and let it sit for two minutes.


Did I mention Robert said he thinks he is addicted to this risotto? So am I ;)