Reker - my ultimate comfort food

Seit meiner Mitgliedschaft bei "The Daring Kitchen" lese ich auch öfters mal die "Members Spotlights" anderer Mitglieder, die monatlich neu erscheinen. Eine der oft gestellten Fragen ist "What is your ultimate comfort food?". Was ist meiner? Lange wußte ich keine Antwort darauf, ist mein Geschmack doch sehr jahreszeiten- und launenabhängig. Mal mag ich nur Pasta oder Risotto, dann nur Pizza; könnte nur Panna cotta oder rote Grütze vernaschen. Aber ein Gericht, für dass ich immer alles stehen und liegen lassen würde und bei dessen Genuss ich so richtig die Seele baumeln lassen kann? Hmm, das hatte ich wohl nicht.
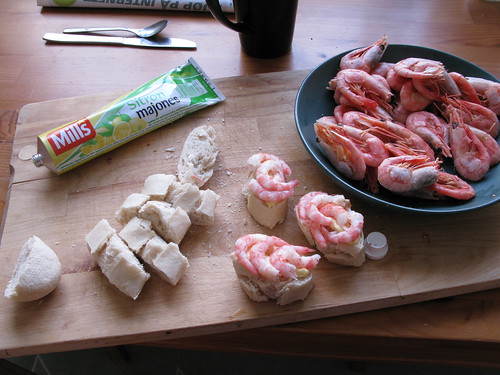
Bis zum nächsten IKEA-Besuch, nach dem es mir dann wie Schuppen von den Augen fiel. Wie immer schlich ich durch die Lebensmittel-Ecke und spähte aus Neugier in die Tiefkühltruhe (das Einzige was ich dort kaufe ist das Knäckebrot) und schüttelte mich beim Anblick des "Almondy Tart", ein widerlich süßer, auch in Norwegen sehr populärer Kuchen. Und dann fiel mein Blick auf sie - REKER (= Garnelen). Tiefgefroren. Noch in der Schale. Wie hatte ich diesen Anblick vermisst! Sofort strömte eine gewaltige Erinnerungsflut auf mich ein. Wie oft war ich in Norwegen in den Supermarkt gegangen um aus der Tiefkühltruhe mit einer Plastikschütte die losen reker in die mit Aluminium beschichtete Tüte zu schaufeln und mich auf ein leckeres Essen zu freuen. Eine Tiefkühltruhe mit losen reker gibt es dort in jedem noch so kleinem Markt, abgefüllt in Tüten bezahlt man sie nach Gewicht. Dazu kauft man noch eine Tube Majonaise und eine Zitrone (oder für die ganz Faulen gleich Majonaise mit Zitronenaroma drin) und fertig! Wie oft habe ich dieses Essen in Norwegen zusammen mit Freunden oder alleine genossen! Meike erinnert sich bestimmt an den einen oder anderen Reker-Abend. Bei meinem letzten Besuch im Februar war es das erste, was ich mir zum Mittagessen gemacht habe (siehe Bild); und außer Kaviar aus der Tube ist es eines einiger weniger norwegischer Lebensmittel/Gerichte die ich wirklich vermisse.


Es war auf jeden Fall kein Knäckebrot, was ich an diesem Tag bei IKEA gekauft habe. Robert hat glaube ich ein bißchen den Kopf geschüttelt weil ich über diese Endeckung und die Aussicht auf ein Rekeressen so ekstatisch war. Ich habe mich wohl aufgeführt als hätte ich den heiligen Gral entdeckt. Zwei Abende später stieg dann das große Ereigniss - Baguettes waren frisch gekauft und aufgeschnitten, die Reker auf meinem tiefen Backblech verteilt und aufgetaut und Zitronen aufgeschnitten. Es konnte also losgehen. Das Puhlen der Reker an sich ist eine schöne Schweinerei. Es empfiehlt sich eine Schürze anzuziehen, denn beim Kopf abkneifen kann es schon mal gewaltig spritzen. Nach spätestens Stück Nummer 10 läuft einem das Wasser an den Armen entlang, und nach einer Weile macht sich der Salzgehalt des selbigen an der Haut bemerkbar. Eine Schüssel mit Wasser und eine Menge Küchentücher sind daher unbedingt erforderlich, genauso eine große Plastiktüte (löcherfrei) zur geruchsarmen Entsorgung der Schalen im Müll.


Nach ungefähr einer dreiviertel Stunge war das Blech leer (das heißt die gesamte Tüte alle), alle pappsatt und Ina wirklich 'comforted'. Es war vielleicht nicht ganz so gut wie in Norwegen, aber fast. Zumindest stillt es ein bißchen die Sehnsucht.

The Daring Bakers December Challenge - Gingerbread House

The December 2009 Daring Bakers' challenge was brought to you by Anna of Very Small Anna and Y of Lemonpi. They chose to challenge Daring Bakers' everywhere to bake and assemble a gingerbread house from scratch. They chose recipes from Good Housekeeping and from The Great Scandinavian Baking Book as the challenge recipes.


I choose Anna's Recipe for the dough:

Spicy Gingerbread Dough (from Good Housekeeping)

  • 2 1/2 cups (500 g) packed dark brown sugar
  • 1 1/2 cups (360 ml) heavy cream or whipping cream
  • 1 1/4 cups (425 g) molasses (I used "Zuckerrübensirup")
  • 9 1/2 cups (1663 g) all-purpose flour
  • 2 tablespoon(s) baking soda
  • 1 tablespoon(s) ground ginger
Because I just wanted a small gingerbread house, I halved the ingredients. For assembling I just used royal icing (no syrup) and for decorating I used what I found in my kitchen, for example a bag of wine gums (some strange present from my parents), marshmallows and grounded pistachios and coconut flakes.

Decoration

  • 25 g white chocolate
  • butter
  • a bag of wine gums
  • about 15 marshmallows, halved lengthwise
  • coconut flakes
  • grounded pistacios
Royal icing

  • three egg white
  • 300 g confectioners sugar
  • onw tablespoon of lemon juice
  • one package powdered food colouring (optional)
In very large bowl, with wire whisk (or with an electric mixer), beat brown sugar, cream, and molasses until sugar lumps dissolve and mixture is smooth. In medium bowl, combine flour, baking soda, and ginger. With spoon, stir flour mixture into cream mixture in 3 additions until dough is too stiff to stir, then knead with hands until flour is incorporated and dough is smooth.
Divide dough into 4 equal portions; flatten each into a disk to speed chilling. Wrap each disk well with plastic wrap and refrigerate at least 4 hours or overnight, until dough is firm enough to roll.
Roll out dough, 1 disk at a time on each cookie sheet to about 3/16-inch thickness. (Placing 3/16-inch dowels or rulers on either side of dough to use as a guide will help roll dough to uniform thickness.) Trim excess dough from cookie sheet; wrap and reserve in refrigerator. Chill rolled dough on cookie sheet in refrigerator or freezer at least 10 minutes or until firm enough to cut easily. Preheat oven to 300 degrees F (149C).
Use chilled rolled dough, floured poster board patterns, and sharp paring knife to cut all house pieces on cookie sheet, making sure to leave at least 1 1/4 inches between pieces because dough will expand slightly during baking. Wrap and reserve trimmings in refrigerator. Combine and use trimmings as necessary to complete house and other decorative pieces. Cut and bake large pieces and small pieces separately. I used the trimmings to cut leaves and two different flower-shaped pieces with different cookie cutters. I used them for the decoration of the roof later - you'll need about 10 leaves and 6 of each flower-shaped piece. For the house, I used the gingerbread cabin/cottage template from here.


Chill for 10 minutes before baking if the dough seems really soft after you cut it. This will discourage too much spreading/warping of the shapes you cut. Bake 25 to 30 minutes, until pieces are firm to the touch. Do not overbake; pieces will be too crisp to trim to proper size. Remove cookie sheet from oven. While house pieces are still warm, place poster-board patterns on top and use them as guides to trim shapes to match if necessary. Cool pieces completely before attempting to assemble the house. I had some issues with one of my roofs because I moved it when still warm and it got a big crack which I had to 'repair' with a hug amount of royal icing - so be carefull!

When chilled, decorate: Melt the white chocolate and stir in some butter until you have a runny consistency. Dip the decoration pieces (leaves and flowers) in it and then into the grounded pistacios (leaves) and coconut flakes (flowers). Let dry.

Meanwhile prepare the royal icing. In the bowl of your electric mixer (or with a hand mixer), beat the egg whites with the lemon juice. Add the sifted powdered sugar and beat on low speed until combined and smooth. Transfer two thirds of the icing into an airtight container and store into the refridgerator for later. The rest of the icing needs to be used immediately as royal icing hardens when exposed to air. Cover with plastic wrap when not in use.

Decorate the roof and sides with wine gums, the leaves and flowers and the marshmallows using the royal icing. When everything is dry, assemble the house and use the rest of the icing for the finishing touch - mix half of the left icing with food colouring to get some extra effects.

The most time consuming thing is waiting ... for the decoration to dry and for the assembled pieces of the house to dry. Drying takes about one to two hours, at least if you want to have everything stable. I assembled first the fronts and sides and after that each roof seperately - the whole process of assembling took an evening. All together I spent for days making that house (one preparing the dough, one baking and decorating, one assembling and one for the finishing touches). Now I have a really nice looking gingerbread house and a final question: Who is going to eat this huge calorie loades 'sugar bomb'?


The Daring cooks December challenge: Beef Wellington

*Note: Here is the project I needed the crepes-pan for (and it was useful for searing the meat too ;)

The 2009 Daring Cooks challenge was hosted by Simone of Junglefrog Cooking . Simone chose Salmon en Croute (or alternative recipes for Beef Wellington or Vegetable en Croute) from Good Food Online .
What a coincidence this month - I had planned to make Beef Wellington this year so I was very gratefull about this challenge. But I didn't imagine in my wildest dreams how difficult it would be to buy beef filet. At the end I ended up with the only and most expensive filet in town: Argentinian beef filet. I had to part the big filet in two small ones of which one got a little bit wider and was too bloody for us at the end - the second one was just fine (and was eaten and therefor not captured in a picture).

Beef Wellington
serves four

  • Button mushrooms - 17.6 ounces/500gr (stalks removed and finely chopped)
  • Olive oil - 2-3 tbsp
  • thyme
  • Beef fillet, center cut piece - 21.16 ounce/600 gr
  • English mustard - 1 tbsp
  • puff pastry (all butter pastry pack) - 17.6 ounce/500 gr
  • parma ham (prosciutto) - 3 slices
  • egg yolk - 1 pcs, beaten
for the herb crepes:

  • plain (all purpose) flour - 0.3 cup/1.76 ounce/50 gr
  • milk - 0.5 cup/125 ml
  • mixed herbs - 1 tbsp (chopped, use herbs such as cervil, chives and tarragon)
  • butter - 0.5 tbsp
To make the crepes, whizz the flour, egg and milk with a pinch of salt in a blender or processor until smooth. Pour into a jug and stir in the herbs and some seasoning. Leave to rest. Fry the mushrooms in a little oil until they give up all their moisture and it has evaporated, leaving you with a thick paste. Add the thyme leaves and some seasoning and keep cooking for a few minutes. Cool. Stir the melted butter into the crepe batter, heat a 15 cm crepe pan and oil it lightly. Pour in enough batter to make a thin layer on the base of the pan, cook until the top surface sets and then turn over and cook briefly. Remove and repeat with the rest of the batter. This will make a couple more than you need so choose the thinnest ones for the recipe.

Sear the beef all over in a little oil in a very hot pan. Brush with the mustard, season and allow to cool. Lay a large sheet of cling-film on a kitchen surface and put two crepes down on it, overlapping a little. Lay over the parmaham (prosciutto). Spread the mushroom mixture over the ham and put the beef in the centre. Roll the cling-film up, taking the crepe with it, to wrap the beef completely into a nice neat log. Chill for 1 hour.

Heat the oven to 200°C/390F. Roll out the pastry, remove the clingfilm and wrap the beef in the pastry like a parcel, with the ends tucked under. Trim to keep it nice and neat. Brush with egg, score with shallow lines across the top and chill for 20 minutes. Cook for 20 minutes. The best way to test if the meat is done to your liking is to neatly and carefully stick a skewer into the beef, count to three and then test it against your inner wrist. If it is cold, the beef will be raw, if it is warm then the beef will be rare and if it's hot, it'll be cooked through. Leave to rest for 20 minutes before carving.


               top: got a little too bloody
               left: star design on top because of christmas
               right: there is the crepe

Kitchen Gadgets - Dinge die man nicht braucht aber trotzdem haben muss

Roberts Albtraum ist nicht einen Klamotten- oder Schuhladen mit mir zu betreten (eher andersrum). Schlimm wird es in der Haushaltswarenabteilung im Karstadt oder im Culinaris in Leipzig. Die ganzen glänzenden Küchenmaschinen von KitchenAid (andere kaufen sich ein DolbySurround-System ...), Gemüsemandolinen, Reiben von Microplane (habe ich zwar schon 2, aber so etwas ist nie verkehrt - sollte ich eventuell auch noch auf meinen Wunschzettel setzten) oder all die schönen Keramikformen oder scharfen Damaszener-Messer. So bleibe ich jeden Meter stehen und himmle andere Sachen an, während hinter mir immer eine Stimme brubbelt: Wozu brauchtst du das denn schon wieder? Wo willst du das überhaupt hinräumen, unsere Küche ist doch schon voll!


So auch wieder geschehen am Mittwoch in der Töpfe- und Pfannen-Abteilung bei Karstadt. Natürlich blieb ich wieder vor den teuersten der Liga stehen - wunderschöne gußeiserne Modelle von Le Creuset. Ich brauchte für ein neues 'Projekt' eine Crepes-Pfanne, hätte ich ja auch irgendeine billige nehmen können, aber darauf wollte ich mich dieses Mal nicht einlassen. Ich habe nämlich noch gar keine gußeiserne Pfanne - und das in einem Haushalt wo so leidenschftlich gekocht und gespeist wird! Eine Schande, ich weiß. Also wurde es die Crepes-Pfanne von Le Creuset, in der ich auch mal ein schönes Steak ordentlich anbraten kann bevor es in den Ofen kommt; und gegen ordentliche Crepes hatte auch Robert nichts einzuwenden (ua mit dem Kommentar: Die ist so flach die kriegen wir noch unter ;) - und da ich schon in Shoppinglaune war, wanderte bei Globetrotter noch eine Grillzange aus Buchenholz in meinen Korb. Ich wollte zwar ursprünglich mal eine mit Silikonbeschichtung haben, aber das Holz sprach mich dann doch mehr an. Die Pfanne wurde am selben Abend noch ausprobiert (dazu in einem späteren Post) und ich liebe sie! Demnächst also nur noch Crepes und Crepe-Rezepte *grins*!


The Daring Bakers November Challenge: Cannoli

The November 2009 Daring Bakers Challenge was chosen and hosted by Lisa Michele of Parsley, Sage, Desserts and Line Drives . She chose the Italian Pastry, Cannolo (Cannoli is plural), using the cookbooks Lidia's Italian-American Kitchen by Lidia Matticchio Bastianich and The Sopranos Family Cookbook by Allen Rucker; recipes by Michelle Scicolone, as ingredient/direction guides. She added her own modifications/changes, so the recipe is not 100% verbatim from either book.

Cannoli are known as Italian-American pastries, although the origin of cannoli dates back to Sicily, specifically Palermo, where it was prepared during Carnevale season, and according to lore, as a symbol of fertility. The cannoli is a fried, tube-shaped pastry shell (usually containing wine) filled with a creamy amalgamation of sweetened ricotta cheese, chocolate, candied fruit or zest, and sometimes nuts. Although not traditional, mascarpone cheese is also widely used, and in fact, makes for an even creamier filling when substituted for part of the ricotta, or by itself. However, cannoli can also be filled with pastry creams, mousses, whipped cream, ice cream etc. You could also add your choice of herbs, zests or spices to the dough, if desired. Marsala is the traditional wine used in cannoli dough, but any red or white wine will work fine, as it's not only added for flavor or color, but to relax the gluten in the dough since it can be a stiff dough to work with. By the way, the name 'Lidisano' is a combination of Lidia, Lisa and Sopranos...

As I read that we were not supposed to bake but to fry this month I was a little bit devastated. I hate frying and avoid doing it whenever possible. Last week a wanted to make donuts and had to fry them (because just fried donuts taste like donuts), but as always my kitchen smelled terrible afterwards and I burned myself really badly with some of the hot oil. So no frying again! I was relieved when I read that baking was allowed too and decided to make Cannoli 'moulds' using muffin moulds for shaping the dough. That worked fine for me and at the end I was satisfied with the result.


Lidisano's Cannoli

22-24 4-inch cannoli

Important: The preparation time is quite long , so the best is making dough and filling the day before. For the dough you'll need 2 hours and 10-20 minutes, including resting time, and depending on whether you do it by hand or machine; and for the filling - 5 to 10 minutes plus chilling time (about 2 hours or more) plus minimum 2 hours for draining the ricotta.

Cannoli Shells (or in my case, moulds)
  • 2 cups (250 g) all-purpose flour
  • 2 tablespoons(28 g) sugar
  • 1 teaspoon (5 g) unsweetened baking cocoa powder
  • 1/2 teaspoon (1.15 g) ground cinnamon
  • 1/2 teaspoon (3 g) salt
  • 3 tablespoons (42 g) vegetable or olive oil
  • 1 teaspoon (5 g) white wine vinegar
  • Approximately 1/2 cup (125 ml) sweet Marsala or any white or red wine
Cannoli filling
  • 250 g ricotta cheese, drained
  • 250 g mascarpone
  • 1 2/3 cups (160 g) confectioner's sugar, (more or less, depending on how sweet you want it), sifted
  • 1 teaspoon (4 g) pure vanilla extract or the beans from one vanilla bean
  • 125 g 'unfinished' lemon curd (means without butter, for the recipe look here and skip the last step)
  • 3 tablespoons (23 g) toasted, finely chopped pistachios
In the bowl of an electric stand mixer or food processor, combine the flour, sugar, cocoa, cinnamon, and salt. Stir in the oil, vinegar, and enough of the wine to make a soft dough. Turn the dough out onto a lightly floured surface and knead until smooth and well blended, about 2 minutes. Shape the dough into a ball. Cover with plastic wrap and let rest in the fridge from 2 hours to overnight.

Pasta Machine method: Divide the dough into 4 equal pieces. Starting at the middle setting, run one of the pieces of dough through the rollers of a pasta machine. Lightly dust the dough with flour as needed to keep it from sticking. Pass the dough through the machine repeatedly, until you reach the highest or second highest setting. The dough should be about 4 inches wide and thin enough to see your hand through. Continue rolling out the remaining dough. If you do not have enough moulds for all of the dough, lay the pieces of dough on sheets of plastic wrap and keep them covered until you are ready to use them.

Part the dough in thirds (should be sqares). Put some muffins moulds upside-down and place the dough over them, making nice folds. Preheat the oven to 180°C and bake for about 10 minutes. Let cool.

For the filling, line a strainer with cheesecloth. Place the ricotta in the strainer over a bowl, and cover with plastic wrap and a towel. Weight it down with a heavy can, and let the ricotta drain in the refrigerator for several hours to overnight. In a bowl with electric mixer, beat ricotta until smooth and creamy. Beat in mascarpone, confectioner's sugar, vanilla and the slightly warm lemon curd and blend until smooth. Chill until firm.(The filling can be made up to 24 hours prior to filling the shells. Just cover and keep refrigerated).

When ready to serve, fill a pastry bag fitted with a 1/2-inch plain or star tip, or a ziplock bag, with the ricotta cream. If using a ziplock bag, cut about 1/2 inch off one corner. Fill the moulds and decorate with chopped pistachios (or grated chocolate/mini chocolate chips). Dust with confectioner's sugar and/or drizzles of melted chocolate if desired.

Mini-Donuts mit Ahornsirup und Walnüssen

Nach meinem Ausflug nach Berlin und der leidenschaftlichen Wiedervereinigung mit dem Blueberry Crunch Donut von Dunkin donuts befand ich mich in einer wahren Donut-Manie. Eine neue Sorte hatte meine besondere Aufmerksamkeit erregt: Ein Donut mit einer Glasur, die Ahornsirup enthielt. Am Anfang hatte ich ja eine (nicht verständliche) Abneigung gegen dieses etwas eigenwillig schmeckende Süßungsmittel gehegt, aber spätestens nach meinen Walnuß-Ahornsirup-Muffins hatte ich meine Meinung komplett geändert. Warum sollte ich zu Hause nicht auch einmal Donuts mit einer Glasur aus Ahornsirup und Walnüssen probieren? Mich schreckte nur das frittieren ab, was immer stinkt und Dreck macht. Als hätte ich es geahnt, ging später dann doch etwas schief und ich trug aus einem dieser 'das Fett spritzt unkontrolliert'-Attacken eine üble Brandblase davon. Ich erwähne nur ganz kurz am Rande dass das Grundrezept für den Teig von Jamie stammt, welches ich nur etwas abgeändert habe. I'm an addict and can't help myself ...

Zutaten für etwa 25 Stück

  • 1 Päckchen Trockenhefe
  • 35 g Zucker
  • 35 g Ahornsirup
  • 500 g Mehl
  • 315 ml lauwarme Milch
  • abgeriebene Schale einer Zitrone
  • 80 g Butter
  • Öl zum Frittieren
für die Glasur und Walnuß"streusel"

  • 100 g Walnüsse
  • 50 + 40 ml Ahornsirup
  • 100 g Puderzucker
Die Zutaten zu einem geschmeidigen Teig verkneten und eine Stunde zugedeckt gehen lassen (zum Glück gibt es Brotbackautomaten die das erledigen können). Den Teig "abschlagen" das heißt die Luft mit ein paar gezielten Schlägen herausklopfen. Auf einer bemehlten Arbeitsfläche einen Zentimeter dick ausrollen und mit einem Ausstecher (oder Glas) Kreise von 5 cm Durchmesser ausstechen. Diese auf einem mit Backpapier ausgelegtem Backblech (besser gesagt Bleche, ich hatte 3 Stück im Einsatz) noch einmal zugedeckt 45 Minuten gehen lassen. Mit einem Stäbchen (oder dem Ende eines Kochlöffels) ein Loch in die Mitte stechen. Das Öl in einem (wichtig!) hohem Topf erhitzen. Die richtige Temperatur ist erreicht wenn der Teig ca eine Minute braucht um goldbraun zu werden, zur Probe ein Stück Restteig verwenden. Die Donuts von jeder Seite eine Minute frittieren und auf Küchenpapier zum abtropfen legen. Dazu noch ein paar Anmerkungen: Die Teigstücke am besten mit der Hilfe von Kochlöffeln ins Öl gleiten lassen und auch damit wenden. Wer wie ich Gabeln benutzt riskiert durch die Spritzer böse Verbrennungen, deswegen auch nicht direkt das Gesicht über den Topf hängen! Nicht zuviel Donuts ins Öl geben, da sonst das Öl zu sher an Temperatur verliert und aus den Donuts Fettschwämmchen werden.
Für die "Streusel" die Walnüsse in einer Pfanne anrösten. Den Sirup dazugeben und gut verteilen. Bei mittlerer Hitze karamellisieren lassen bis alles von den Nüssen 'aufgesogen' ist. Auf einem mit Backpapier ausgelegtem Blech verteilen und erkalten lassen. Mit Hilfe einer Pfanne oder Nudelholzes in kleine Stücke hacken. Den Puderzucker portionsweise mit dem Ahornsirup mischen bis die Glasur eine dickflüssige Konsistenz hat. Dann auf den Donuts verteilen und mit den "Streuseln" bestreuen.

Kürbis mit Auberginen-Ricotta-Füllung

Ja, die klassische (vegetarische) Füllung für den Kürbis ist immer noch die Beste - letztens gab es eine Hackfüllung, die ich aber viel zu krümelig und trocken fand ... Als ich wieder einmal auf der Suche nach einer Verarbeitungsmöglichkeit für Auberginen war, wurde ich bei La Tartine Gourmande fündig. Das Rezept für gefüllte Auberginen, welches in der Food section des Boston globe veröffentlicht wurde, ist vielleicht ein bißchen aufwendig aber zollt dem sonst doch unterschätzten Gemüse Tribut (von meiner ersten Durchführung gibt es leider keine Bilder, so schnell waren die Auberginen weg). Warum sollte diese Füllung also nicht auch für einen Kürbis geeignet sein? Es waren nur ein paar kleine Abänderungen in der Menge und der Zusammensetzung der Rezeptzutaten notwendig.

für 4 Personen

  • ein Hokkaido-Kürbis, Durchmesser ca 20 cm
Füllung:

  • eine Aubergine
  • 3 Zweige frischer Thymian (oder 2 TL getrockneter)
  • 1 TL Koriander, gemahlen
  • ca 100 g Schinkenspeck, gewürfelt (am besten Pancetta)
  • 125 g Ricotta
  • 2 große Tomaten, geachtelt
  • 100 g passierte oder Dosentomaten
  • eine Schalotte, gehackt
  • eine Knoblauchzehe, gehackt
  • ein Lorbeerblatt
  • 50 g frisch geriebener Parmesan
  • Olivenöl
  • Salz & Pfeffer
Die Aubergine halbieren und gut mit Olivenöl einreiben, mit Salz und Pfeffer würzen. Backofen auf 200°C vorheizen und die Auberginen auf ein mit Backpapier ausgelegtes Blech setzen. 20 Minuten backen, bis sie weich sind. Die Schalotte mit dem Koriander und dem Thymian (und wer mag Chilipulver) ca 3 Minuten anbraten, dann den Knoblauch dazugeben, für eine Minute weitergaren. Die Tomaten (frische und passierte), Salz, Pfeffer, Lorbeerblatt dazugeben und weiterkochen. Inzwischen die Auberginen aushöhlen und die etwas festere Schale in Stücke schneiden. Fruchtfleisch und Schale zur Tomatensoße geben und nochmal für sieben Minuten kochen lassen. Vom Kürbis einen Deckel abschneiden und aushöhlen. Den Backofen auf 180°C herunterschalten.

Aus der Tomaten-Auberginen-Soße das Lorbeerblatt und die Thymianzweige entfernen, den Ricotta, Schinkenspeck und den Parmesan unterrühren. Mit Salz und Pfeffer abschmecken. In den ausgehöhlten Kürbis füllen. Ohne Deckel in den Ofen stellen. Für 45 Minuten garen lassen, dann den Deckel aufsetzen und weitere 45 Minuten im Ofen backen.


Die Schale kann natürlich wie immer mitgegessen werden. Es empfiehlt sich den Kürbis in eine große Auflaufform oder auf ein mit Backpapier ausgelegtes Backblech zu stellen da er meistens nach der Hälfte der Garzeit anfängt zu tropfen.

Daring Cooks November Challenge – Sushi

The November 2009 Daring Cooks challenge was brought to you by Audax of Audax Artifex and Rose of The Bite Me Kitchen. They chose sushi as the challenge.

Sushi (寿司 or 鮨 or 鮓) is much appreciated for its delicate taste and exquisite appearance. Sushi actually means vinegared rice, which is the essential ingredient in every sushi recipe. Sushi is simple and cheap to make at home, needs no special equipment and is an excellent way to use left overs. Although sushi in various forms has been around for fourteen centuries, the modern version was invented in Japan in the 1800's where a 'hand-formed' sliced fresh fish and vinegared rice ball was eaten as a snack food. Nowadays, sushi is made with various seafood, meats and vegetables, raw and cooked.

I love sushi. It's the first food I'm thinking about when we are going to Dresden at the weekends. There is no place you can get good sushi here, so I always have a crave for it when there is a possibility to get some. But making it yourself is something completely different. First of all I had again problems getting hold of certain ingredients - no chance of getting sushi grade fish ... I used smoked one and liked the taste even better. I never thought the rice would be the most labour-intensive part of the work, but it was. Doing the caterpillar roll was even more tricky - sticky rice all over the place, no knife which was sharp enough to cut sufficiently which resulted in a really squeezed appearance. I liked the avocado topping though I normally wouldn't eat it. In the end we had good homemade sushi (exept for some disfigurements) and Robert already dreamed of inviting our friends for dinner ... (No way, how am I gona produce that amount of sushi rice?)


SUSHI RICE
(makes about 7 cups of cooked sushi rice)

Preparation time: 1¾ hours consisting of :
Rinsing and draining rice: 35 minutes
Soaking rice: 30 minutes (includes 5 minutes making the vinegar dressing)
Cooking and steaming time: 25 minutes
Finishing the rice: 15 minutes

  • 2½ cups uncooked short grain rice
  • 2½ cups water
Sushi vinegar dressing
  • 5 Tablespoons (75 mls) rice vinegar
  • 5 Teaspoons (25 mls or 21 grams) sugar
  • 1¼ Teaspoons (6.25 mls or 4.5 grams) salt
Swirl rice gently in a bowl of water, drain, repeat 3-4 times until water is nearly clear. Don't crush the rice in your hands or against the side of the bowl since dry rice is very brittle. Gently place rice into a strainer and drain well for 30 minutes. Place the rice into a heavy medium pot with a tight fitting lid (if you have a loose fitting lid use a piece of aluminium foil to make the seal tight). Set the rice aside to soak for 30 minutes, during this time prepare the sushi rice dressing.

Combine the rice vinegar, sugar and salt in a small bowl. Heat on low setting. Stir until the mixture goes clear and the sugar and salt have dissolved. Set aside at room temperature until the rice is cooked.

After 30 minutes of soaking add sake (if using) to the rice. Bring rinsed and soaked rice to the boil. Reduce heat to the lowest setting and simmer, covered, until all the water is absorbed, 12-15 minutes. Do not remove the lid during this process. Turn off heat. Let stand with the lid on, 10-15 minutes. Do not peek inside the pot or remove the lid. During this time the rice is steaming which completes the cooking process.

Moisten lightly a flat thin wooden spatula or spoon and a large shallow flat-bottomed non-metallic (plastic, glass or wood) bowl. Do not use metallic objects since the vinegar will react with it and produce sour and bitter sushi rice. Use the spatula to loosen gently the rice and invert the rice pot over the bowl, gently causing the cooked rice to fall into the bowl in one central heap. Do this gently so as not to cause the rice grains to become damaged. Slowly pour the cooled sushi vinegar over the spatula onto the hot rice. Using the spatula gently spread the rice into a thin, even layer using a 45° cutting action to break up any lumps and to separate the rice. Don't stir or mash rice. After the rice is spread out, start turning it over gently, in small portions, using a cutting action, allowing steam to escape, for about a minute.

Continue turning over the rice, but now start fanning (using a piece of stiff cardboard) the rice vigorously as you do so. Don't flip the rice into the air but continue to gently slice, lift and turn the rice occasionally, for 10 minutes. Cooling the rice using a fan gives good flavour, texture and a high-gloss sheen to the rice. The vinegar dressing will be absorbed by the hot rice. Using a small electric fan on the lowest speed setting is highly recommended. Stop fanning when there's no more visible steam, and all the vinegar dressing has been adsorbed and the rice is shiny. Your sushi rice is ready to be used. Cover with a damp, lint free cloth to prevent the rice from drying out while preparing your sushi meal. Do not store sushi rice in the refrigerator leave on the counter covered at room temperature. Sushi rice is best used when it is at room temperature.

Tip: To make sushi rice: for each cup of rice use 1 cup of water, 2 Tbs rice vinegar, 2 tsp sugar, ½ tsp salt and 1 tsp sake. For superior results use equal volumes of rice and water when cooking the sushi rice since the weight of rice can vary. Weight of 2½ cups of uncooked rice is about 525 grams or 18½ ounces.

DRAGON ROLLS (also called Caterpillar Rolls)

Yield: 2 inside-out (uramaki) sushi rolls

  • 1 sheet 7"x8" (17.5cmx20cm) of toasted nori (dried seaweed sheets), cut into halves
  • 1/2 (Japanese) cucumber
  • 2 cups of prepared sushi rice
  • smoked salmon (about 3½ ounces or 100 grams)
  • 1 Avocado
  • Vinegared Water - ½ cup of water combined with a dash of rice vinegar
  • Various small amounts of sauces to use as the flames of the dragon (or legs of a caterpillar)
  • 2 tablespoons (25 grams or 1 oz) Fish Roe (Fish eggs) (optional)

Cut cucumber into strips ¼ inch (6mm) x 7" (175mm) long, then salt, rinse & dry the strips. Cut salmon into two lengthwise strips. Halve, pit and peel the avocado. Cut the avocado halves into thin even 1/8 inch (3 mm) slices. Fan out the cut avocado into a 7 inch (175 mm) overlapping pattern. Cover bamboo mat with plastic wrap. Place a sheet of nori shiny side down , lengthwise, on the edge the mat. Moisten lightly your hands in the bowl of vinegared water. Place one cup of rice on the nori and gently rake your fingertips across grains to spread rice evenly. Do not mash or squash the rice onto the nori, the rice should appear loosely packed and be evenly distributed over the entire sheet, you should be able to see the nori sheet in a few places. Flip the rice-covered nori over (so the bare nori is now on top) and place on the edge of the mat closest to you. Arrange one of the eel strips across the length of the nori, not quite centred on it but a little closer to you. Place half the cucumber sticks next to the eel. Lift the edge of the mat closest to you with both hands, keeping your fingertips over the fillings, and roll the mat and its contents until the edge of the mat touches straight down on the nori, enclosing the fillings completely. Lift up the edge of the mat you're holding, and continue rolling the inside-out roll away from you until it's sealed. Tug at the mat to tighten the seal. If the rice doesn't quite close the roll add more rice in the gap and re-roll using the mat to completely cover the inside-out roll. Place the roll on a damp, clean smooth surface. Spread about 1 tablespoon of the optional fish roe along the entire top of the rice-covered roll. Using the plastic covered mat gently press the fish roe so it adheres to the rice. Slide a knife under one fan of avocado and transfer it onto the top of an inside-out roll. Gently spread out the avocado layer to cover the entire roll. Lay the plastic wrapped mat over the avocado-covered roll. Squeeze very gently to shape the roll. Lay a sheet of plastic wrap over the roll. Slice the roll into 6-8 equal, bite-sized pieces, wiping your knife with a damp towel before each slice. Discard the plastic wrap. Repeat the above to make one more roll. Arrange the cut pieces on a serving plate with the sauces so the finished dish appears as a dragon breathing fire and flames (or a caterpillar with many legs).

The most common mistake is having too much filling the golden rule is less is more when it comes to making sushi it is easier to roll an under-filled roll than an over-filled roll. Dampen your knife with a moist lint-free towel before every cut - this prevents the sushi rice from sticking to your knife. Excellent video on making Dragon Rolls.


SPIRAL SUSHI ROLL

Yield: One Roll, cut into 8 pieces

  • 2½ cups prepared sushi rice
  • 2 sheets of toasted nori, each sized 7"x8" (17.5cmx20cm)
  • Six assorted fillings, each filling should be the size of a pencil,
  • my choices: salmon, fish roe, vegetarian fish roe (contains seaweed), shitake mushrooms, cucumber, blue mussels
Join 2 sheets of nori by moistening the adjacent edges and overlapping them about ½ inch (12mm). Place this double sheet shiny side down on a rolling mat, part of the nori will extend beyond the mat. Using moist fingers place 2½ cups of rice on the nori and gently rake your fingertips across grains to spread rice evenly, leaving ¼ inch (6mm) nori showing on the both ends of the sheet. Do not mash or squash the rice onto the nori, the rice should appear loosely packed and be evenly distributed over the entire sheet, you should be able to see the nori sheet in a few places. Using your fingers form six grooves (in the same direction that you will be rolling the mat) at even intervals across the bed of rice. Make each groove about a finger-width wide they will hold about 1-2 tablespoons of filling. Make the first groove about 2 inches (50 mm) from the edge of the nori sheet. Form the grooves by pushing the rice away, do not mash or squash the rice, leave a loose one grain layer of rice in the bottom of the grooves. Level the areas between the grooves where you have pushed the rice. Place your fillings in the grooves. Fill the grooves a little higher than the surrounding rice bed. Then roll the sushi up from the edge closest to you, this will form a spiral pattern of nori, rice and fillings inside the roll. Slice into 8 pieces with a very sharp wet knife, wiping the blade with a damp cloth after each cut. Place the pieces on a platter and garnish.


NIGIRI SUSHI
Yield: 14-16 pieces of sushi

Nigiri sushi is the type of sushi most often made in sushi bars. In Japanese, nigiri means "squeeze".

  • 2 cups prepared sushi rice
  • 8 pairs of assorted toppings, 200 gms/7 ozs total of fish, meat or vegetables (see note below)
  • 1 tablespoon Wasabi (paste, reconstituted powder) or any other paste to adhere topping to rice
When handling sushi rice, make certain your hands are very clean. To keep the rice from sticking to our hands moisten your hands with vinegared water. Form nigiri sushi by scooping up a small amount (about 2 tablespoons) of rice with your forefinger and second finger of your right hand and placing it in your cupped left palm. Use the fingers and thumb of your right hand to form it into a long, narrow mound (about 2 inches x 1 inch wide or 50mm x 25mm) in your cupped palm. Press enough to make the rice hold firmly together. Place the nigiri on a damp cutting board flat side down. Don't let sushi touch or they'll stick to each other. At this point, you can cover the sushi with plastic wrap, and they'll keep at room temperature (not the refrigerator) for several hours. Smear a thin line of wasabi on top of the rice and place the topping piece on it. You may need to press the topping down lightly with your fingers and adjust the shape of the rice accordingly to form an attractive piece of nigiri sushi. If your topping is very loose like fish roe you can place a strip of nori (higher than the rice) around the nigiri and form 'battleship' sushi. The cavity that the nori forms holds the topping so it does not fall off. Garnish as desired and use strips of nori (or vegetable) to tie the topping to the nigiri if needed. A great video on making nigiri sushi.

Bananen-Chai-Muffins mit Vanillecremefüllung

Neulich hatte ich noch einen Rest Vanillecreme von einem Tartebelag und wollte ihn nicht wegwerfen. Außerdem waren noch einige übereife Bananen übrig. Zum Glück waren es nur zwei, und es ereilte mich nicht so ein Schicksal wie Tartelette, die plötzlich mit über zwnazig dieser von ihr ungeliebten Früchten dastand. Einige der Ideen in ihrem 'Bananen-Bewältigungs-Post' sind sehr verlockend (insbesondere die Donuts), die werde ich sicherlichauch noch probieren. Ich entschied mich aber letzendlich für eine einfache Variante - ich wollte Muffins backen, allerdings mit einem etwas exotischeren Aroma. Seit meinen Chocolate-Chai-Cupcakes wollte ich mal wieder die damals hergestellte Gewürzmischung verwenden. Die Vanillecreme passte recht gut als Füllung dazu, also losgelegt.

Trockene Zutaten:
  • 200 g Mehl
  • 1 TL Backpulver
  • 1/2 TL Natron
  • 2 TL Chai-Gewürzmischung, fein gemahlen
  • eine Prise Salz
Feuchte Zutaten:
  • anderthalb reife Banane, zerdrückt
  • 80 ml Öl
  • 120 ml Buttermilch
  • 2 Eier
  • 140 g Zucker
  • 1 TL Vanillesirup
Das Rezept für die Vanillecreme findet ihr hier.

Trockene Zutaten mischen. Die Eier mit dem Zucker schaumig schlagen, Buttermilch, Öl, Sirup und die Banane einrühren. Dann die feuchten zu den trockenen Zutaten geben und untermischen. In mit Papier ausgelegte Muffinsförmchen füllen, dabei zuerst die Förmchen nur zur Hälfte füllen, die Vanillecreme (ca einen TL) in die Mitte geben und mit Teig bedecken. Im vorgeheizten Backofen bei 180°C für 20 Minuten backen.

Da ich einen recht großen Teigüberschuß hatte (ich wollte nur 12 Muffins backen, das Rezept reicht aber locker für 18 Stück), konnte ich noch einige Gläser füllen. Von denen waren auf wundersame Weise in den nächsten Tagen die meisten geleert ... Eins konnte ich retten. Das steht jetzt erst einmal zur Haltbarkeitsbeobachtung gut versteckt in Dunkeln.


Ode to red fruits: Apple-Cranberry-Crumble

Please don't wonder this post is in English - I got an e-mail this week from a non-german-speaking friend asking for an easy recipe. The whole thing was about some kind of chain-mail (I suppose), but no threats or promises where included. You know me and my passion, if the word recipe, cooking or baking is included I immediately do 'ignite'. So I thougt "I was supposed to post this recipe anyway on my blog, so why not write in English and share it with some others more?"
Here you are. Last time at the supermarket I couldn't overcome the temptation of buying some fresh cranberries. I never baked or cooked with them before (apart from those jellies you rarely use) and was curious how they would taste raw. Well, really sour. And because I have a sweet tongue, I added sugar, a crusty dough and some apples to make a delicious crumble. If you can't get hold of cranberries, you can substitute them with other sour fruits like blackberries or raspberries or just use apples. Instead of the rice flour you can just use cake flour.


Apple-Cranberry-Crumble

(adapted from La Tartine Gourmande)

For the fruit:
  • 3 apples
  • 300 g cranberries
  • 1/3 cup (60 g) brown sugar
  • 1 tablespoon lemon juice
  • 1 tablespoon cornstarch
For the topping:
  • 1/2 cup (50 g) cake flour
  • 1/2 cup (65 g) walnuts, coarsly chopped
  • 1/2 cup (50 g) rice flour
  • 1/4 cup (33 g) hazelnuts, grounded
  • 1/2 cup (90 g) brown sugar
  • 7.5 tablespoons (about 100 g) butter, at room temperature, diced
Preheat the oven at 160°C (320°F) and have one casserole ready. Butter it and set aside. In a bowl, combine the cranberries, apples, sugar, cornstarch and lemon juice. To prepare the crumble topping, in a bowl, combine the flours. Add the grounded hazelnuts, brown sugar and walnuts. Add the butter and using the tip of your fingers, work the ingredients together to obtain crumbles. If to moist, add some more flour. Add on top of the fruit. Bake the crumbles for 30 minutes, or until the fruit is bubbly and the top is golden. Serve warm with vanilla sauce or ice.


The Daring Bakers October Challenge: Macarons

The 2009 October Daring Bakers' challenge was brought to us by Ami S. She chose macarons from Claudia Fleming's The Last Course: The Desserts of Gramercy Tavern as the challenge recipe.

The moment I read the challenge I knew I was screwed. I had tried making meringue a hundred times before and always failed - my speciality was overbeating ... And now I was supposed to make macarons. All the additional information provided made my head spinning round. Making macarons seemed to be a science more complicated than doing maths. At first I was optimistic and started blue-eyed into this adventure. My first batter was a mess and the mounds kept leaking and merging into each other. In addition they burned (have a look at the black ones in the right corner). Second try, similar outcome. I got flat soft cookies (middle).
[A bunch of macawrongs]

I have to confess I cheated at the end - after two whole batches of macawrongs I was really desperate - I wanted to succeed and not to surrender! The recipe for Almost Foolproof Macarons was promising (it uses the Italian method where you use sugar syrup to stabilize the meringue) and I tried one last time. The meringue this time looked like this:


Finally stiff peaks!

After starring the first minutes into the oven I saw them rise ... and rise ... some cracks into the shells ... calm down, there are just a few ... they look really close to what they are supposed to look ... I even can see some 'feet'! Not to mention I was happy. Ok, the first tray wasn't baked quite right and the macarons turned out to be to soft (the left ones in the first picture), but the rest was fine. Crispy and pretty. Maybe I'll try again later with more ideas and flavour combinations, but for now I'm glad the simple thing worked.


This one looks perfect ...

Lemon Macarons
Ingredients (yields about two dozen filled macarons):
  • Confectioners' (Icing) sugar: 2 ¼ cups (225 g, 8 oz.)
  • Almond flour: 2 cups (190 g, 6.7 oz.)
  • Granulated sugar: 2 tablespoons (25 g , .88 oz.)
  • Egg whites: 5 (Have at room temperature)
For the lemon curd filling:
(adapted from Canelle et Vanille)
  • 1 egg + 4 egg yolks
  • zest of 1 lemon
  • 90 grams sugar
  • 140 grams lemon juice
  • 1 sheet of gelatin
  • 140 grams butter, cut into small cubes
Directions:
1. Preheat the oven to 200°F (93°C). Combine the confectioners' sugar and almond flour in a medium bowl. If grinding your own nuts, combine nuts and a cup of confectioners' sugar in the bowl of a food processor and grind until nuts are very fine and powdery.
2. Beat the egg whites in the clean dry bowl of a stand mixer until they hold soft peaks. Slowly add the granulated sugar and beat until the mixture holds stiff peaks.
3. Sift a third of the almond flour mixture into the meringue and fold gently to combine. If you are planning on adding zest or other flavorings to the batter, now is the time. Sift in the remaining almond flour in two batches. Be gentle! Don't overfold, but fully incorporate your ingredients.
4. Spoon the mixture into a pastry bag fitted with a plain half-inch tip (Ateco #806). You can also use a Ziploc bag with a corner cut off. It's easiest to fill your bag if you stand it up in a tall glass and fold the top down before spooning in the batter.
5. Pipe one-inch-sized (2.5 cm) mounds of batter onto baking sheets lined with nonstick liners (or parchment paper).
6. Bake the macaroon for 5 minutes. Remove the pan from the oven and raise the temperature to 375°F (190°C). Once the oven is up to temperature, put the pans back in the oven and bake for an additional 7 to 8 minutes, or lightly colored.
7. Cool on a rack.
8. For the filling, mix sugar, zest and lemon juice in a small pot and bring slowly to a boil, mix constantly. It should start to thicken. Meanwhile have the gelatin softening in cold water. Squeeze out excess water and when the curd has thickened, add the gelatin to the bowl. Strain the curd through a sieve into a bowl. Add the butter to the curd, one piece at a time by using a submersion blender. Let cool in the refrigerator for at least four hours. Fill into a pastry bag and start assembling your macarons ...

Voila:

There is just one last question: What am I going to do with the ten remaining egg yolks ???

Apfel-Calvados-Flan-Tarte

Herbst ist Apfelzeit, un da ich die kleinen runden Früchte nicht so gerne pur esse (da kribbelt es gerne mal in meinem Hals), verarbeite ich sie gerne zu Kuchen oder Crumble. Eine Tarte war sowieso überfällig, also warum nicht mit Äpfeln. Ich hatte zwar schon eine mit Karamell ausprobiert, aber danach stand mit nicht gerade der Sinn. In meinem Kopf spukte die Vorstellung von einer Kreation mit Pudding umher ... In einem Video bei einer der letzten Daring Bakers Challenges hatte ich die Herstellung einer Crème pâtissière (oder auch Konditroreme) verfolgt und zu meinem Erstaunen festgestellt, dass diese (eigentlich Vanillepudding-artige) Creme, deretwegen ich so gerne diese mit ihr gefüllten süßen Teilchen vom Bäcker aß, aus nichts weiter bestand als Eier, Milch, Vanille, Zucker und Mehl. Das hatte ich ja alles da! Schnell im Internet nach einem Rezept gesucht ... Das Hindernis waren am Ende nur die Eier, sechs Eigelb, ach herrje! Ich wollte eigentlich erst nur die Hälfte der Menge des gefundenen Rezeptes machen, aber die Mengenangaben einiger Zutaten ließen sich schlecht hälfteln und dritteln, so dass ich mich dann doch an die Originalangaben hielt. Von der Creme braucht man ungefähr drei Viertel, den Rest verwendete ich dann für die Füllung der nächsten Ladung Muffins ... Für den Teig wählte ich das Rezept welches ich in einer Daring Bakers Challenge verwendet hatte, anstatt Wasser nahm ich aber Apfelschnaps (Calvados). Das Ganze ist relativ zeitaufwendig, am Besten fängt man an die Äpfel einzulegen und dann den Teig herzustellen. Während der im Kühlschrank ruht, kann man die Creme zubereiten.


für den Mürbeteig:

  • 225g Mehl
  • ½ TL Salz
  • 110g kalte Butter, in Würfel geschnitten
  • 2 Eigelb
  • 1/2 TL Vanillesirup (optional)
  • 30 g Zucker
  • 1-2 TL Calvados
Mehl, Salz und Zucker mischen. Die Butter mit den Fingerspitzen untermischen bis eine krümelige Masse entstanden ist. Eigelb und Calvados (und Sirup) einarbeiten bis ein schöner glatter Teig eintsteht, wenn notwendig noch etwas Wasser dazugeben. In Frischhaltefolie wickeln und im Kühlschrank eine halbe Stunde ruhen lassen.

für die Crème pâtissière (pastry cream oder Konditorcreme):

  • 6 Eigelb
  • 125 g Zucker
  • 25 g Mehl
  • 480 ml Milch
  • das Mark einer Vanilleschote
Eigelb mit einem Drittel des Zucker zu einer schaumigen Masse schlagen, dann das Mehl unterrühren. Den restlichen Zucker mit dem Mark der Vanilleschote und der Milch in einem Topf erhitzen. Wenn das Ganze kocht, zur Eigelbmischung geben, dabei gut mixen. Zurück in den Topf gießen und aufkochen lassen, für weitere 2 Minuten kochen lassen. In eine Schüssel füllen und zum Abkühlen beiseite stellen - mit Frischhaltefolie bedeckt (die Folie auf die Oberfläche der Creme gelegt) verhindert man dass sich diese häßliche Haut bildet.

für den Belag:
  • 5 mittelgroße säuerliche Äpfel
  • ein Glas Calvados
Die Äpfel schälen, halbieren und das Kerngehäuse entfernen. Mit einem scharfen Messer die Hälften mit parallelen Schnitten in einem Abstand von einem halben Zentimenter einschneiden. Die Apflehälften in einer Schüssel mit dem Calvados übergießen und darin ca eine Stunde ziehen lassen, ab und zu mischen so dass alle Hälften gleichmäßig getränkt werden.


Den Teig ausrollen und eine Tarteform damit auslegen. Den Boden mit der Konditorcreme bestreichen, von der Höhe etas niedriger als die Teigränder. Die Apfelhälften gut abtropfen lassen und mit der flachen Seite auf der Tarte verteilen, dabei gut in die Creme drücken. Im vorgeheizten Backofen bei 180°C (Umluft) 30-35 Minuten backen.

Kürbis-Orangen-Suppe

Die Idee zu dieser Suppe für kalte Herbsttage stammt von unserer kleinen Reise in den Harz. In unserem kleinen gemütlichen Hotel bekamen wir am ersten Abend ein 4-Gänge-Menü serviert, welches wirklich ausgezeichnet war. Der zweite Gang war eine Kürbissuppe mit gerösteten Kürbiskernen, die uns geschmacklich doch sehr überraschte. Es war erstens kein Hokkaido-Kürbis, sondern eine andere Sorte. Zweitens war der Geschmack eher süß und das Kürbisaroma nur sehr dezent - er erinnerte mich sehr an Weihnachten und Lebkuchen(gewürze). Auf Nachfrage verriet der Koch leider nur dass er Ingwer und Orange verwendet hatte, die Geheimzutat blieb geheim. Da mir diese Variante aber sehr gut gefiel, versuchte ich sie nachzukochen, was recht gut gelang.


Kürbis-Orangen-Suppe
für 5-6 Portionen

  • 1 kg Hokkaido-Kürbis, die Kerne entfernt und in Würfel geschnitten
  • Saft und abgeriebene Schale einer Bio-Orange
  • 300 ml Orangensaft, mind 50% Fruchtgehalt
  • 1200 ml Gemüsebrühe oder Gemüsefond
  • 2 Schalotten, gehackt
  • 10 Nelken (ganz)
  • 2 Stück Sternanis
  • ein ca 5 cm langes Stück Ingwer, in Scheiben geschnitten
  • Salz und Chilipulver
  • 2 EL Zucker
  • geröstete Kürbiskerne nach Belieben
Anis und Nelken (ohne Öl) in einer Pfanne kurz anrösten bis sie anfangen zu duften. Mit der Orangenschale, Schalotten, Ingwer und Brühe in einen großen Topf geben und aufkochen lassen. 15 Minuten auf kleiner Hitze köcheln lassen. Dann durch ein Sieb gießen und zurück auf den Herd stellen. Die Kürbiswürfel dazugeben und kochen bis sie weich sind (etwa 20 Minuten). Pürieren, bis eine einheitliche Masse einstanden ist. Den Orangensaft untermischen bis die gewünschte Konsistenz erreicht ist. Mit Zucker, Salz und Chili würzen und noch einmal aufkochen. Noch einmal abschmecken. In große Tassen füllen und mit den Kürbiskernen garniert servieren.

Tipp: Wer keine Bio-Orange zur Hand hat, kann auch ein Päckchen Orangenzucker verwenden, diesen dann zum Schluß anstatt des normalen Zuckers zugeben.


Wien - Heimat süßer Gaumenfreuden und kulinarischer Köstlichkeiten

Mein Besuch in Wien schlug sich wie vermutet ganz schnell auf die Hüfte nieder. Die dortige Kaffeehaus-Kultur lädt geradezu ein bei einem großen (oder auch kleinem) Stück Gebäck oder Torte zu verweilen und die mannigfaltigen Arten der Kaffeezubereitung zu genießen: Brauner, Einspänner, Melange usw (ein Link dazu findet sich weiter unten). Einen ausgiebiger Besuch verdiente auch das Demel, Wiens k.u.k. Hofzuckerbäckerei. Die ausladende Tortenauslage enthielt zwar den Kalorienbedarf eines ganzen Monats, aber war allzu verführerisch. Unter den Sahne- und Buttercremekunstwerken entdeckte ich auch einen alten Bekannten, die Dobos-Torte. Ich hätte so einmal das Original probieren können oder mir in einen edlen Karton zum Mitnehmen einpacken lassen, aber ich war mehr an der Süßwarenabteilung interessiert. Sich dort süße Souvenirs zu kaufen erschöpft aber schneller den Geldbeutel als man denkt. Von in kleinen Holzkisten eingepackten Demel- und Sachertorten, Schichtnougat, Minzschokolade und Katzenzungen bis hin zu verschiedensten Pralinensortimenten in wunderschönen Schachteln findet sich alles was gut und teuer ist. Nachdem ich mit Schichtnougat und einer Pralinenschachtel (oder eher Schächtelchen) zugeschlagen hatte, hob ich mir die Torte für den nächsten Tag auf. In einem der 'klassischen' Wiener Cafés, dem Café Landtmann, genehmigte ich mir ein Stück Himbeersouffle-Torte. Dabei ist der Bestellvorgang etwas seltsam - die Dame an der Theke händigt einem einen Zettel mit einer Nummer aus, nachdem man sich für ein Stück entschieden hat. Den Zettel bekommt der Ober, der dann das gewünschte Stück etwas später serviert.

Da mein süßer Zahn bekanntlich größer ist als der von anderen, konnte ich auch der Versuchung nicht widerstehen, als ich im Buchladen eine Ausgabe des Gourmet-Magazins A la carte: Das süße Wien fand. Noch mehr Zuckerzeug! Hatte ich erwähnt dass ich eigentlich wegen eines Diabetes-Kongresses in Wien war? Passt irgendwie nicht so zusammen ;) Ein Tipp aus dem Magazin war "Bonbons Dürnberger" in der Neubaugasse. Neben allerlei Kleinigkeiten zum Abfüllen sollte es auch einen Großteil des Zotter-Sortimentes geben. Nichts wie hin! Dieser Laden ist wie ein großer bunter Kindertraum ... altmodische Einrichtung, Schaufensterauslagen aus Glas, Holzregale und -schubladen, und wohin das Auge auch blickt, vom Boden bis zur Decke nur Süßigkeiten. Natürlich wurde ich auch fündig und schwebte im siebten Zotter-Schokoladen-Himmel, und zu meinem Glück gab es auch gerade eine Verkostung ... Neben der Gelegenheit eher seltene und neue Sorten zu erstehen, die man in Deutschland schwer bekommt, machte ich noch ein Schäppchen (11 für den Preis von 10). Empfehlen kann ich auch die Labooko Himbeer & Kokos und die Gelbe mit Banane.

Für Münder die lieber herzhafte Sachen verspeisen, seien auch einige gute Plätze genannt. Ein Wiener Klassiker ist das Figlmüller. Bitte nehmt das 'Spezial', ein riesiges und hauchdünnes Wiener (Kalbs)Schnitzel, das über den Tellerrand reicht. Dazu gehört der Erdäpfel-Vogerl-Salat (Kartoffelsalat mit Feldsalat obendrauf), der mit seinem säuerlichen Dressing und dem steirischen Kernöl darauf hervoragend dazu passt. Zum Glück hatte ich den ganzen Tag gehungert, so das sich mit Ach und Krach Platz in meinem Magen für dieses Riesenstück Fleisch fand.

Liebhaber anderer Länderküchen werden ebenso fündig. Von osteuropäischen bis hin zu orientalischen und auch asiatischen Küchen ist alles vertreten, Orient bis Okzident. Ich war im RaMien in der Gumpendorfer Straße. Die Nudelgerichte sind ein Traum, also vor 15 oder nach 18 Uhr kommen! Wenn man dann auch noch schafft, die langen Nudeln mit dem Stäbchen oder dem Löffel ohne sich vollständig zu bespritzen aus der Soße zu holen ist das Essen perfekt.

Gleich in der Nähe, die Straße hinunter schräg gegenüber vom Café Sperl (auch ein guter Platz um den Tag zu beginnen) liegt das Suppito. Leider hatte ich keine Gelegenheit einzutreten, denn am einzigen Tag wo ich Zeit dafür gehabt hätte (Freitag) ist es geschlossen. Sonst hätte ich mir glatt eine der leckeren Suppen mitgenommen ... Also zurück zum Café und erstmal einen Kaffee *Hand vor den Mund halt*. So etwas bestellt man doch hier nicht! Genau, hier folgt der Link zum kleinen Kaffee-ABC.

Den krönenden Abschluß sollte ein Besuch auf dem Wiener Naschmarkt bilden. Am besten man plant einen ganzen Tag ein und probiert sich durch die verschiedenen Stände. Gelegenheiten zum Essen gibt es auch genug, besonders das Palatschinkenkuchl mit einer endlosen Auswahl an herzhaften und süßen Platschinken ist einen Abstecher wert. Wer sich zu Hause immer über die schlechte Obst- und Gemüseauswahl oder Qualität ärgert, wird hier große Augen machen. Es gibt die exotischsten Dinge in einer Top-Qualität. Dazu finden sich italienische, türkische und orientalische Spezialitäten aneinandergereiht. Mein Traum von einem perfekten selbst gekochten 4-Gänge-Menü geginnt mit einem Einkauf auf dem Naschmarkt, ein wahres Fest für die Sinne ...

Und selbst wer keine Zeit hat, sich in ein Café oder Restaurant zu setzen (eigentlich in Wien nicht erlaubt, Zeit für einen Cafébesuch muß sein!) oder über Märkte und durch Läden zu schlendern, kann sich auch mit einem Besuch des 'profanen' Bäckers am Straßenrand etwas Gutes tun, denn auch dort ist die Auswahl exzellent. Ich empfehle einen Nussbeugel.


oben: Süßwaren aus dem Demel, die Tortenanrichte (Mitte)
Mitte (kleine Bilder): Schaufensterauslage im "Bonbons Dürnberger", frische Cranberries und türkische Süßwaren auf dem Naschmarkt
Mitte (großes Bild): Gemüsestand auf dem Naschmarkt
unten: Schnitzel im Figlmüller, Antipasti auf dem Naschmarkt

The Daring cooks Oktober challenge: Vietnamese Chicken Pho

The October 2009 Daring Cooks' challenge was brought to us by Jaden of the blog Steamy Kitchen. The recipes are from her new cookbook, The Steamy Kitchen Cookbook.

First of all, I wasn't feeling especially daring this month. I am glad I managed to do the challenge(s) at all. It's not that I don't have the time to spend three or four evenings in the kitchen - I cannot afford to spend them ... Since work is getting more and colleagues less I sometimes feel to suffocate with all the tasks around me, that far even taking pictures is just frustrating (which - the worse - you can clearly see). So I decided for the Quick version of the Pho with store-bough stock and skipped the dessert challenge too. I felt a little bit sorry for that later becaus the taste was delicious! It was a real "chicken soup for the soul". I think I'll use the secrets to make great Pho (see below) in a lot of other dishes in the future.

Firstly Jadens remarks and explanations (you shouldn't start without having them in mind):

"So what is Vietnamese Pho? Well, it's like the most insanely delicious noodle soup popular in Vietnam. The broth is simmered for hours and hours with either beef knuckle/leg bone or with a whole chicken. Other accompaniments include ribbons of rice noodles, fresh herbs like cilantro or basil, a wedge of lime or lemon, fresh bean sprouts and fresh sliced chilies if desired.
What makes Pho so different than any other type of noodle soup is the spices that go into the simmering broth. Warm spices like coriander, star anise, cloves, cinnamon, fresh ginger transform an ordinary broth into a very authentic Vietnamese Pho.

Some of the secrets to making great Chicken Pho is:

Toast the spices and char the onion and ginger. This brings out the flavor and fragrance of these ingredients! If you're cooking the longer recipe (on my site) make sure you're pre-boiling the chicken first - give it a hard boil for a few minutes to get rid of the scum and stuff in the chicken. This will help you create a crystal clear, clean broth.

An essential component of Pho is fish sauce. Make your best effort to find fish sauce - your local Asian market should carry it. And if not, visit your local Thai or Vietnamese restaurant and see if you can buy a bottle from them. Soy sauce is a poor substitute for fish sauce, but if you can't find fish sauce, then go ahead and make the sub."

Ingredients:

  • 2 tbsp. whole coriander seeds
  • 4 whole cloves
  • 2 whole star anise
  • 2 quarts (2 liters/8 cups/64 fluid ounces) store-bought or homemade chicken stock
  • 1 whole chicken breast (bone in or boneless)
  • ½ onion
  • 1 3-inch (7.5 cm) chunk of ginger, sliced and smashed with side of knife
  • 1 to 2 tbsps. sugar
  • 1 to 2 tbsps. fish sauce
  • 1 lb. (500 grams/16 ounces) dried rice noodles (about ¼ inch/6 mm wide)
Accompaniments:

  • 2 cups (200 grams/7 ounces) bean sprouts, washed and tails pinched off
  • Fresh cilantro (coriander) tops (leaves and tender stems)
  • ½ cup (50 grams/approx. 2 ounces) shaved red onions
  • ½ lime, cut into 4 wedges
  • Sriracha chili sauce
  • Hoisin sauce
  • Sliced fresh chili peppers of your choice
NB: It was a little bit difficult for me to get hold of bean sprouts (I had to use canned ones), fresh cilantro (half of the cilantro I got was already withered), fish sauce and rice noodles since I had to find my way to a store about 30 km away - and because I won't use Hoisin or Sriracha sauce in the near future I did without them ...

Directions:
  1. To make the Chicken Pho Broth: heat a frying pan over medium heat. Add the coriander seeds, cloves and star anise and toast until fragrant, about 3-4 minutes. Immediately spoon out the spices to avoid burning.
  2. In a large pot, add all the ingredients (including the toasted spices) and bring to a boil.
  3. Reduce the heat to medium-low and let simmer for 20 minutes, skimming the surface frequently.
  4. Use tongs to remove the chicken breasts and shred the meat with your fingers, discarding the bone if you have used bone-in breasts.
  5. Taste the broth and add more fish sauce or sugar, if needed. Strain the broth and discard the solids.
  6. Prepare the noodles as per directions on the package.
  7. Ladle the broth into bowls. Then divide the shredded chicken breast and the soft noodles evenly into each bowl.
  8. Have the accompaniments spread out on the table. Each person can customize their own bowl with these ingredients.

The Daring Bakers September challenge: Puff pastry dough and Vols-au-Vent

The September 2009 Daring Bakers' challenge was hosted by Steph of A Whisk and a Spoon. She chose the French treat, Vols-au-Vent based on the Puff Pastry recipe by Michel Richard from the cookbook Baking With Julia by Dorie Greenspan.

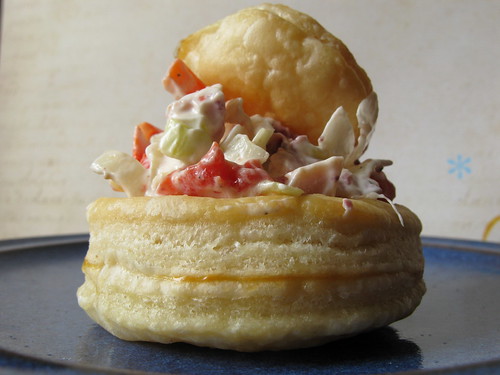
I knew this day would come. I knew there would be a time when I had to try a puff pastry myself, but I didn't know it would be that soon ... Roberts first comment on that issue: "Do we have some earplugs so that I don't need to hear your screaming from the kitchen?". Yeahh, I felt like screaming - how am I gonna to do that? Somehow I managed it at the end ... I found out that I just needed patience (and I don't own much of it which was the real challenge for me). I used 2/3 of the remaining dough for a tart with the chicken-filling (mixed with an egg and coverd with cheese) and 1/3 for a completely self-made banana tarte tatin (adapted from here, used my self-made caramel-sauce instead). The tarte tatin was incredible and I was in dessert heaven. Thank you Steph for making me try, the tarte was a hundred times worth it!


Michel Richard's Puff Pastry Dough

From: Baking with Julia by Dorie Greenspan
Yield: 2-1/2 pounds dough

There is a wonderful on-line video from the PBS show "Baking with Julia" that accompanies the book. In it, Michel Richard and Julia Child demonstrate making puff pastry dough (although they go on to use it in other applications). They do seem to give slightly different ingredient measurements verbally than the ones in the book…I listed the recipe as it appears printed in the book.

Ingredients:
(1/3 of the puff pastry recipe will yield about 8-10 3,8 cm Ø vols-au-vent or 4 10,2 cm Ø vols-au-vent)

  • 2-1/2 cups (12.2 oz/ 354 g) unbleached all-purpose flour
  • 1-1/4 cups (5.0 oz/ 142 g) cake flour
  • 1 tbsp. salt (you can cut this by half for a less salty dough or for sweet preparations)
  • 1-1/4 cups (10 fl oz/ 300 ml) ice water
  • 1 pound (16 oz/ 454 g) very cold unsalted butter
  • plus extra flour for dusting work surface
Mixing the Dough:

Check the capacity of your food processor before you start. If it cannot hold the full quantity of ingredients, make the dough into two batches and combine them. Put the all-purpose flour, cake flour, and salt in the work bowl of a food processor fitted with a metal blade and pulse a couple of times just to mix. Add the water all at once, pulsing until the dough forms a ball on the blade. The dough will be very moist and pliable and will hold together when squeezed between your fingers. (Actually, it will feel like Play-Doh.) Remove the dough from the machine, form it into a ball, with a small sharp knife, slash the top in a tic-tac-toe pattern. Wrap the dough in a damp towel and refrigerate for about 5 minutes.
Meanwhile, place the butter between 2 sheets of plastic wrap and beat it with a rolling pin until it flattens into a square that's about 1" (2,5 cm) thick. Take care that the butter remains cool and firm: if it has softened or become oily, chill it before continuing.

Incorporating the butter:
Unwrap the dough and place it on a work surface dusted with all-purpose flour (A cool piece of marble is the ideal surface for puff pastry) with your rolling pin (preferably a French rolling pin without handles), press on the dough to flatten it and then roll it into a 10" (25 cm) square. Keep the top and bottom of the dough well floured to prevent sticking and lift the dough and move it around frequently. Starting from the center of the square, roll out over each corner to create a thick center pad with "ears," or flaps.
Place the cold butter in the middle of the dough and fold the ears over the butter, stretching them as needed so that they overlap slightly and encase the butter completely. (If you have to stretch the dough, stretch it from all over; don't just pull the ends) you should now have a package that is 8'' (20cm) square.
To make great puff pastry, it is important to keep the dough cold at all times. There are specified times for chilling the dough, but if your room is warm, or you work slowly, or you find that for no particular reason the butter starts to ooze out of the pastry, cover the dough with plastic wrap and refrigerate it . You can stop at any point in the process and continue at your convenience or when the dough is properly chilled.

Making the Turns:
Gently but firmly press the rolling pin against the top and bottom edges of the square (this will help keep it square). Then, keeping the work surface and the top of the dough well floured to prevent sticking, roll the dough into a rectangle that is three times as long as the square you started with, about 24" (61 cm) (don't worry about the width of the rectangle: if you get the 24", everything else will work itself out.) With this first roll, it is particularly important that the butter be rolled evenly along the length and width of the rectangle; check when you start rolling that the butter is moving along well, and roll a bit harder or more evenly, if necessary, to get a smooth, even dough-butter sandwich (use your arm-strength!).
With a pastry brush, brush off the excess flour from the top of the dough, and fold the rectangle up from the bottom and down from the top in thirds, like a business letter, brushing off the excess flour. You have completed one turn.
Rotate the dough so that the closed fold is to your left, like the spine of a book. Repeat the rolling and folding process, rolling the dough to a length of 24" and then folding it in thirds. This is the second turn.


Chilling the Dough:
If the dough is still cool and no butter is oozing out, you can give the dough another two turns now. If the condition of the dough is iffy, wrap it in plastic wrap and refrigerate it for at least 30 minutes. Each time you refrigerate the dough, mark the number of turns you've completed by indenting the dough with your fingertips. It is best to refrigerate the dough for 30 to 60 minutes between each set of two turns.
The total number of turns needed is six. If you prefer, you can give the dough just four turns now, chill it overnight, and do the last two turns the next day. Puff pastry is extremely flexible in this regard. However, no matter how you arrange your schedule, you should plan to chill the dough for at least an hour before cutting or shaping it.

Making the vols-au-vent

In addition you will need:

  • egg wash (1 egg or yolk beaten with a small amount of water)
  • your filling of choice (mine see recipe below)
Smoked-chicken-bell pepper-leek-filling

  • meat of one smoked chicken leg, cut into small pieces
  • one leek, divided in halves and cut in stripes
  • 5 small filled hot pepper bells in oil
  • 1 pepper bell, diced
  • 125 g sour cream
  • 125 g joghurt
  • salt & pepper
Line a baking sheet with parchment and set aside.
Using a knife or metal bench scraper, divided your chilled puff pastry dough into three equal pieces. Work with one piece of the dough, and leave the rest wrapped and chilled. (If you are looking to make more vols-au-vent than the yield stated above, you can roll and cut the remaining two pieces of dough as well…if not, then leave refrigerated for the time being or prepare it for longer-term freezer storage. See the "Tips" section below for more storage info.)
On a lightly floured surface, roll the piece of dough into a rectangle about 1/8 to 1/4-inch (3-6 mm) thick. Transfer it to the baking sheet and refrigerate for about 10 minutes before proceeding with the cutting.
(This assumes you will be using round cutters, but if you do not have them, it is possible to cut square vols-au-vents using a sharp chef's knife.) Using a ¾-inch cutter for small vols-au-vent, or a 2- to 2.5-inch round cutter for large, cut centers from half of the rounds to make rings. These rings will become the sides of the vols-au-vent, while the solid disks will be the bottoms. You can either save the center cut-outs to bake off as little "caps" for you vols-au-vent, or put them in the scrap pile.
Dock the solid bottom rounds with a fork (prick them lightly, making sure not to go all the way through the pastry) and lightly brush them with egg wash. Place the rings directly on top of the bottom rounds and very lightly press them to adhere. Brush the top rings lightly with egg wash, trying not to drip any down the sides (which may inhibit rise). If you are using the little "caps," dock and egg wash them as well.
Refrigerate the assembled vols-au-vent on the lined baking sheet while you pre-heat the oven to 400ºF (200ºC). (You could also cover and refrigerate them for a few hours at this point.)

Once the oven is heated, remove the sheet from the refrigerator and place a silicon baking mat (preferred because of its weight) or another sheet of parchment over top of the shells. This will help them rise evenly. Bake the shells until they have risen and begin to brown, about 10-15 minutes depending on their size. Reduce the oven temperature to 350ºF (180ºC), and remove the silicon mat or parchment sheet from the top of the vols-au-vent. If the centers have risen up inside the vols-au-vent, you can gently press them down. Continue baking (with no sheet on top) until the layers are golden, about 15-20 minutes more. (If you are baking the center "caps" they will likely be finished well ahead of the shells, so keep an eye on them and remove them from the oven when browned.)
Remove to a rack to cool. Cool to room temperature for cold fillings or to warm for hot fillings.
For the filling mix sour cream, joghurt, 2 tblsp of the hot pepper bell oil and the hot pepper bell filling. Season with salt and pepper. Add the chicken, leek and diced pepper bells. Fill into the vols-au-vents and enjoy.